
A Professional Photographer's Guide to DIY, Gorgeous Christmas Card Photos

Christmas is sneaking up on the calendar swiftly and the pressure to have holiday gifts and cards is creeping upon us. As a professional photographer, I enjoy the challenge of photographing my family and have had a bit of practice at it. Unfortunately, my own husband is pretty reluctant to pose for a photographer - he even refused to have engagement photos done, so I made it my goal to photograph them myself. Whether you are in a situation where you don’t feel comfortable posing for a portrait, or you don’t want to spend money on photos, I’m here to help you on your DIY photo journey.
Let’s begin with your overall look.
Clothing!
If you are photographing a group, outfits that visually make sense together is key. You don’t (and shouldn’t) go all out in blue jeans and white tops like an awkward family photo entry! Sticking within a color palette that shows up within the group is key to looking polished. I personally love cranberry and creams, or navy and hunter green for seasonal portraits. Buffalo plaid is another favorite. Break up the look so it isn’t overly matchy-matchy and you’ll be golden.
I highly suggest avoiding lettering on apparel. It rarely works well. Clothing wrinkles and doesn’t stay put. And when it does, it is a visual distraction. Same goes for large graphics on a t-shirt. Even if your kid really loves that Frozen t-shirt with Elsa’s face on it, save it for when the camera is put away.
If there are adults with pockets in your photo, make sure everyone empties them! Your mantra as you leave the house might be “Phone? Wallet? Keys?” as you stuff your pockets with your items, but in a photo it can look like someone is overly excited to be there, if you catch my drift. Bulges aren’t cute.
Posing!
When it comes to children, adults are used to viewing them from above. Photographing a baby or young child from below creates a jarring unnatural look. I highly suggest photographing kids at their eye level or from above. No one wants to look up someone’s nose in a photo!
This is probably a given, but If you’re dealing with little people who need naps, make sure you are photographing them at a point in time where they aren’t about to mentally crash. It can take a few goes before you get the image you’re looking for, and let’s face it, there might be a bribe included. Set yourself up at the time of day that works best with their behavior. Try not to stress them out by asking too much of small children. A simple command of “put your arm around your sister and smile” or “cuddle up your teddy bear and look up at me” should do the trick.
If you want to photograph children laying down on a blanket together (an adorable pose in my opinion) you want to be sure you are directly above them, with the camera or phone parallel to their faces. Simply said you want the photo to look like a front on portrait, without an angle.
This one is more for the adults or bigger kids…try to relax your hands. I find that people often ball their fists when trying to pose for a photo, which of course looks aggressive. If you don’t know what to do with your hands, stick them in a pocket or rest them in a belt loop.
Time of day and lighting!
The best time for light is in the early morning or late afternoon lovingly referred to as “golden hour” by photographers. This generally means one or two hours after the sun has risen or is about to set. The sun is at its lowest in the sky, creating a pretty natural light situation. This of course isn’t ideal timing for everyone, so my best suggestion is if you can’t be ready for golden hour, to avoid direct sunlight at around noon when the sun is at its highest.
If you have to shoot mid-day, the best tip is to photograph in an outdoor location with shade. Shade creates even light, which takes away the harsh shadows midday sun is guilty of.
sponsored by

Setup!
Now that you’ve hopefully figured out when to shoot due to lightning and your own schedule, you need to decide what is in the background. I tend to find trees, bushes, textured walls like stone or brick, or wooden fences to be good backdrops. Make sure the grass is clean of things like wrappers or toys in your frame.
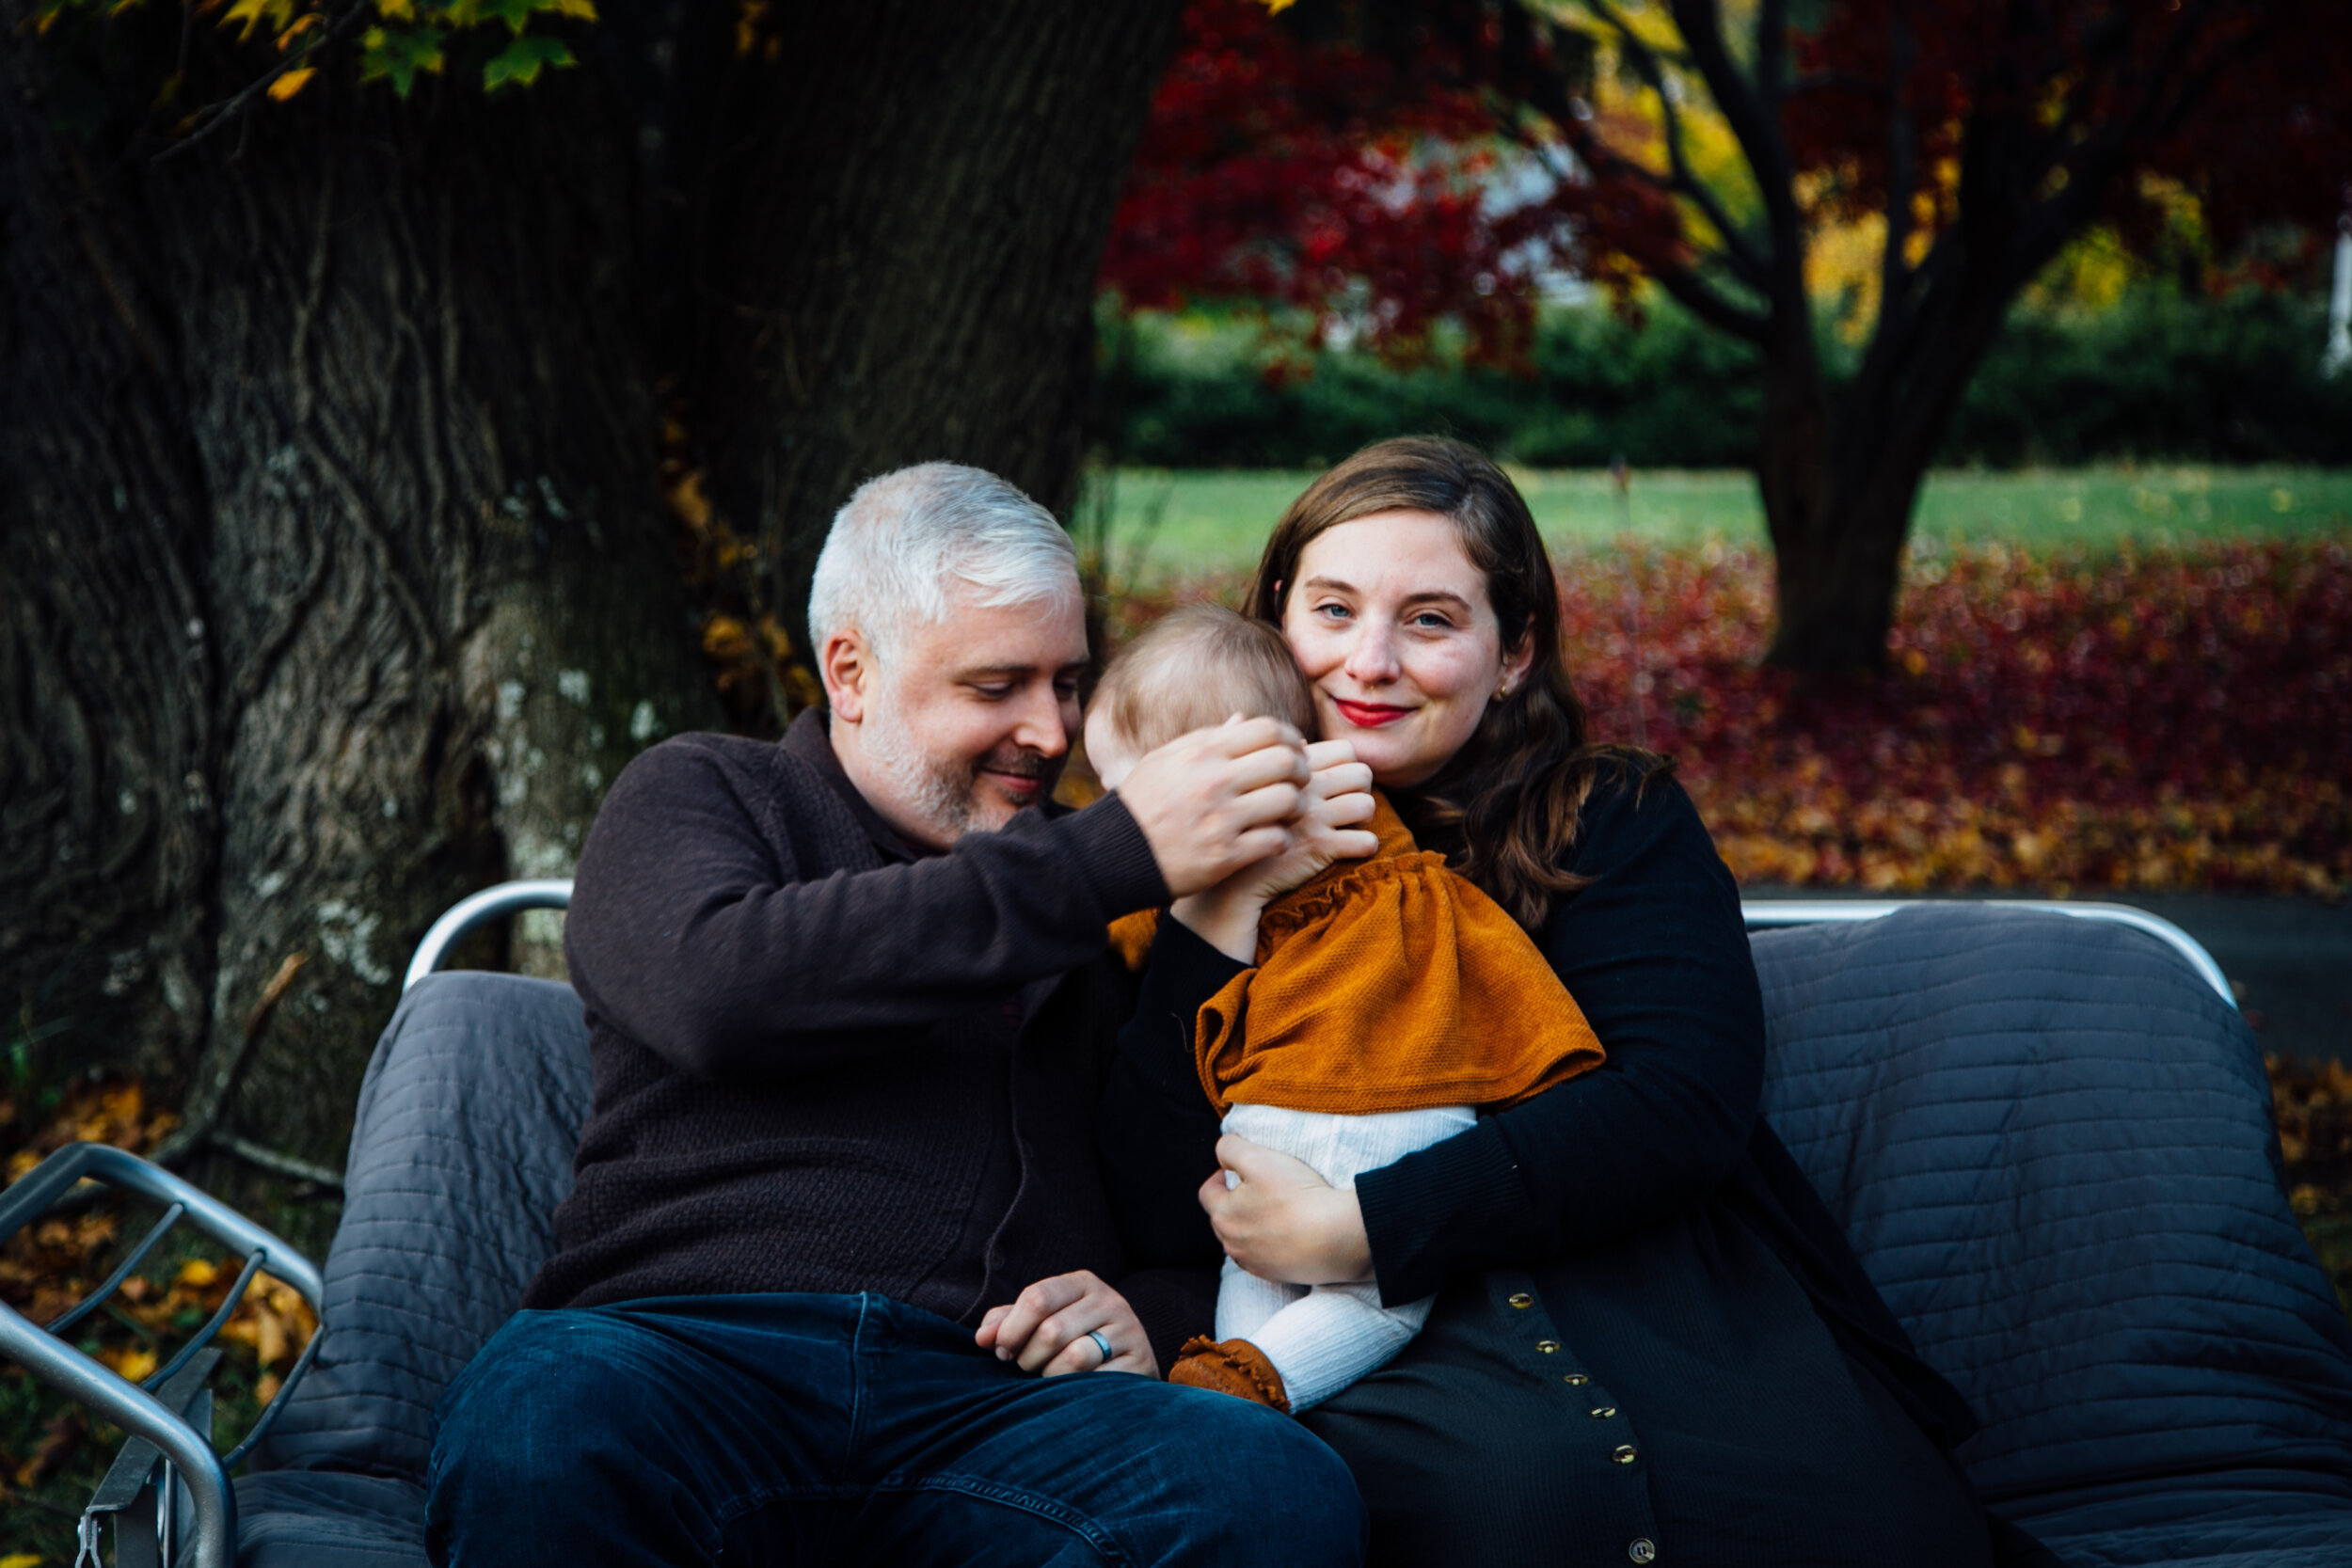
I prefer to keep it simple. Sitting on a blanket outside is a favorite for me, or using available furniture. For my own holiday cards, my husband, baby and I sat on our glider which I covered with a blanket to make it look cleaner.
If you are only photographing your kid/s, you can bring out a favorite chair, tricycle or rocking horse to sit on. When I photographed my neighbor, I brought out a cute kid-sized rocking chair and placed it in front of some bushes in the shade.
Have no idea how to operate that fancy camera you own? There’s no shame in putting it on auto!
Have a slight idea on how to change settings but don’t know where to start? For groups of people at varying levels of height, f5.6 is a pretty safe aperture to be at. If you are only photographing one person, most lenses have the ability to shoot at f4 and that is a decent portrait aperture - if you can go lower to say f2.8 or 1.8 even better. Remember, you always want your shutter speed to be as fast as possible (the higher the number) otherwise things become blurry if the camera is handheld at around 1/80th of a second. Aim to be at 1/100th of a second or higher if you aren’t using a tripod.
If this is going to be a family affair…
If you are using a DSLR (digital single lens reflex camera) and are going to be in it, it’s easiest to use a tripod. You can refer to your camera’s manual if you don’t already know how to turn on the 10-second self-timer option.
Some cameras have a remote shutter app. Again, check your camera specs to see if this is an option for you.
Phones also have a 10-second self-timer option! If you have a tripod for your phone great, otherwise you can lay it on a flat surface as a makeshift tripod.
For most cameras, you’ll need to get up and touch the shutter button each time (it took me 20 takes before I got the portrait I’m using for my holiday card!) so patience is key.
Be sure that the adults are looking at the camera (or adoringly at the kids if that’s your objective.) It’s easiest to not waste energy and time looking at how the children are doing because they could be smiling perfectly and the opportunity was missed because mom and/or dad was preoccupied.
Just capturing the kids?
The most fun part of photographing kids is getting them to laugh. I have become really good at making funny noises or faces, with the photo already framed and my finger on the trigger, ready to capture natural expressions.
Have fun with it. Kids mirror your energy. If you seem stressed or angry, they will likely become more difficult. Make it a game (or even having a special treat ready for afterward) so it’s a good time. If it isn’t going well, take a break and revisit the project once everyone involved is in a better headspace.
Ask the kids how they’d like to pose. If you give them some creative control they might come up with someone good. When I take studio portraits, I always ask the child to strike a pose and they generally come up with something amazing. Giving a cue like “show me your best tough-guy pose” or “can you stand like a superhero” may give you something adorable.
Post processing!
If you are using your camera phone, check out the VSCO app or Lightroom mobile (check your app store.) Both are excellent for photo editing and have the option of using them for free.
When editing on your phone, always make sure the screen is at its highest brightness. Also, whenever you get to the place where you think the photo looks good with a filter, dial it back just a little. Less is more.
If you’ll be editing on your computer, my favorite software is Lightroom, which unfortunately is not free. You can subscribe to Adobe for $9.99 a month or check out this list of free editing software for other resources.
Now for printing.
If you are looking to have holiday cards printed, you’re in luck, there are a ton of great options out there. For the budget-conscious, I trust VistaPrint and honestly use them myself. If you are looking for a high-quality product, Minted is exquisite.
For photo prints, I am a big fan of Printique and MPIX . They are the two highest quality printing companies available for consumer use, in my humble opinion. No matter what though, avoid the kiosks at your local drug store or discount department store, they are all over the place as far as how they handle color management and no one is maintaining the calibration on those machines. Not. Worth. It.
So, how did this turn out for me?
A few weekends ago I photographed my husband, daughter and I for our Christmas cards. I accomplished this with a tripod set up about twenty feet away from us. Since I don’t post my daughter on the internet, we turned her around for this one to share here. I adjusted my camera settings to “Auto” for this one, just so I could really go with the DIY attempt. I picked out neutral fall colors that I knew would complement the foliage behind us. Like I mentioned above, I added a blanket to our outdoor glider to class it up. It took about twenty takes, of me getting up to press the shutter, with only two winners; one being this one here, and the other with her facing the camera, which will be on our holiday card. I think they turned out pretty decent despite being a good amount of work on my end. I wound up getting cards made through VistaPrint and am super pleased with them.
And on another day, I photographed my friend’s daughters so you could see a cute example of multiple kids. I pulled out a kid-sized rocking chair and had them sit together. For outfit inspiration, I simply told mom “think Christmas cards.” I only spent ten minutes with them and banged out about twenty photos for their gallery. It is obviously much easier to be behind the camera rather than in the photo as well - but if you are feeling brave, I applaud you!

If you are able to create your own masterpiece and feel like sharing, tag #mydiyphotosesh on Instagram so we can tell you how awesome you did! Have fun and good luck, I believe in you!